昨晚,Qwen 团队正式开源了 Qwen2-VL 的 2B、7B 和 72B 模型,进一步增强了开源多模态大模型的家族。以下是相关资源地址:
实践中出现问题:
| # 1.transformers 4.45 版本找不到 | |
| pip install git+https://github.com/huggingface/transformers.git | |
| # 2.module 'torch.nn' has no attribute 'RMSNorm' | |
| pip install torch==2.4 |
各个尺寸的榜单

7B

2B

Qwen2-VL 模型亮点
对比 Qwen-VL
Qwen2-VL 相比 Qwen-VL,做出了如下改进:
- 适配不同分辨率和不同长宽比的图片
- 长视频理解:可以理解 20 分钟以上的长视频
- 复杂推理和决策能力:根据视觉环境和文字指令进行自动操作手机、机器人等设备
- 多语言支持:除英语和中文外,还支持大多数欧洲语言、日语、韩语、阿拉伯语、越南语等
模型结构
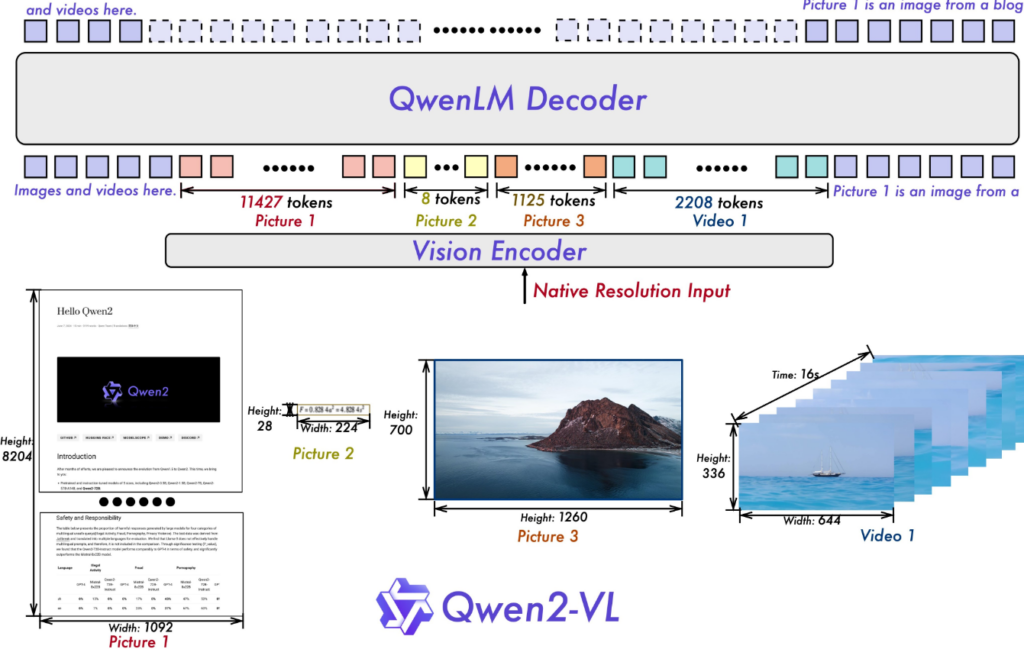
Qwen2-VL 采用了 ViT 加 Qwen2 的串联结构,在 2B、7B 和 72B 三个不同尺度的模型上,均采用 600M 参数的 ViT,支持图像和视频的统一输入。
- 动态分辨率支持 :Qwen2-VL 的一项关键架构改进是实现了朴素动态分辨率支持。与前代不同,Qwen2-VL 能够处理任意图像分辨率,将其映射为动态数量的视觉令牌,从而确保模型输入与图像固有信息之间的一致性。这种方法更贴近人类视觉感知,使模型能够处理任何清晰度或尺寸的图像。 不同大小的图片被转换为动态数量的 tokens,最小只占 4 个 tokens。

- 多模态旋转位置嵌入(M-ROPE):多模态旋转位置嵌入(M-ROPE)的创新。将原始旋转嵌入分解为代表 时间、高度和宽度 的三个部分,使大规模语言模型能够同时捕捉和整合一维文本序列、二维视觉图像以及三维视频的位置信息。

huggingface 代码实践
| ```python | |
| import glob | |
| import os | |
| from transformers import Qwen2VLForConditionalGeneration, AutoTokenizer, AutoProcessor | |
| from qwen_vl_utils import process_vision_info | |
| model_name = r"/adata/models/qwen/Qwen2-VL-7B-Instruct" | |
| model = Qwen2VLForConditionalGeneration.from_pretrained(model_name, torch_dtype="auto", device_map="auto") | |
| # We recommend enabling flash_attention_2 for better acceleration and memory saving, especially in multi-image and video scenarios. | |
| # model = Qwen2VLForConditionalGeneration.from_pretrained( | |
| # "Qwen/Qwen2-VL-7B-Instruct", | |
| # torch_dtype=torch.bfloat16, | |
| # attn_implementation="flash_attention_2", | |
| # device_map="auto", | |
| # ) | |
| # default processer | |
| processor = AutoProcessor.from_pretrained(model_name) | |
| def get_image_items(image_path, prompt): | |
| messages = [ | |
| { | |
| "role": "user", | |
| "content": [ | |
| { | |
| "type": "image", | |
| "image": f"file:///{image_path}", | |
| }, | |
| {"type": "text", "text": prompt}, | |
| ], | |
| } | |
| ] | |
| # Preparation for inference | |
| text = processor.apply_chat_template(messages, tokenize=False, add_generation_prompt=True) | |
| image_inputs, video_inputs = process_vision_info(messages) | |
| inputs = processor(text=[text], | |
| images=image_inputs, | |
| videos=video_inputs, | |
| padding=True, | |
| return_tensors="pt", | |
| ) | |
| inputs = inputs.to("cuda") | |
| # Inference: Generation of the output | |
| generated_ids = model.generate(**inputs, max_new_tokens=128) | |
| generated_ids_trimmed = [ | |
| out_ids[len(in_ids) :] for in_ids, out_ids in zip(inputs.input_ids, generated_ids) | |
| ] | |
| output_text = processor.batch_decode(generated_ids_trimmed, skip_special_tokens=True, clean_up_tokenization_spaces=False) | |
| return output_text[0] | |
| import matplotlib.pyplot as plt | |
| from PIL import Image | |
| def display_image(image_path): | |
| """ | |
| Display an image using Matplotlib and PIL. | |
| Parameters: | |
| image_path (str): The path to the image file. | |
| """ | |
| img = Image.open(image_path) # 使用 PIL 打开图像 | |
| plt.imshow(img) # 显示图像 | |
| plt.axis('off') # 关闭坐标轴 | |
| plt.show() # 展示图像 | |
| image_file = "/root/aprojects/data/1.png" | |
| print(str(get_image_items(image_file, prompt="识别票据,并按照原始格式输出"))) | |
| display_image(image_file) | |
| ``` | |
| 具体效果如图: |

正文完


